These resources should help you prepare your artwork and understand more about printing. For other questions, we are always here to help! If you have any questions, email us at print@brinkmanpress.com or call us at (317) 722-0305.
Jump to a section:
Bleed
Borders
Color Mode
Fonts
Image Resolution
Fonts & Lines
Safety Zone
Size
We can accept a wide variety of file formats (below)
Desktop Publishing Files
.INDD – Adobe InDesign
Document Files (Text and Plain Text)
.DOC – Microsoft Word document
.DOCX – Office Open XML document
.DOT – Microsoft Word document template
.DOTX – Office Open XML text document template
.INFO – Text info
.PAGES – Apple Pages document
.PDF – Portable Document Format
.RTF – Rich Text document
Raster Graphics Files (images as a group of pixels): Raster images use many colored pixels or individual building blocks to form a complete image. JPEGs, GIFs, and PNGs are common raster image types. Almost all of the photos found on the web and in print catalogs are raster images. Because raster images are constructed using a fixed number of colored pixels, they can't be dramatically resized without compromising their resolution. When stretched to fit a space they weren't designed to fill, their pixels become visibly grainy and the image distorts. This is why altered photos may appear pixilated or low resolution. Therefore, it is important that you save raster files at precisely the dimensions needed to eliminate possible complications.
Common Types:
.BMP – Microsoft Windows Bitmap formatted image
.GIF – CompuServe's Graphics Interchange Format
.ICO – a file format used for icons in Microsoft Windows. Contains small bitmap images at multiple resolutions and sizes.
.IFF – Interchange File Format
.JP2 – JPEG2000
.JPG – Joint Photographic Experts Group – a lossy image format widely used to display photographic images.
.JPEG – Joint Photographic Experts Group – a lossy image format widely used to display photographic images.
.PNG – Portable Network Graphic lossless, for display and edition of graphic images
.PSD – Adobe Photoshop Drawing
.RAW – General term for image data acquired by a digital camera
.TIF – Tagged Image File Format
.TIFF – Tagged Image File Format
Vector Graphics Files: Vector images allow for more flexibility than raster images. Constructed using mathematical formulas rather than individual colored blocks, vector file types such as EPS, AI, and PDF are excellent for creating graphics that frequently require resizing. Your company logo and brand graphics should be created as a vector and saved as a master file so you can use it with smaller items such as your business card or letterhead, but also larger surfaces, such as a billboard.
Common Types:
.AI – Adobe Illustrator Document
.DVI – Tex
.EPS – Encapsulated Postscript
.GZ – PostScript
.PDF – Portable Document Format
.PS – PostScript
Back to Top
Bleeds
Bleed refers to a background color, graphic, or image that extends to the edge of the finished paper size and beyond. It's difficult for printing equipment to apply ink up to the cut edge of a sheet of paper. So an extra .125" (3mm) margin is typically added on each side of the design, enabling the background color, graphic, or image to extend past (i.e., "bleed off") the paper's final trim edge. This extra bleed area will be cut off the printed sheet. For example, a letterhead sheet that incorporates bleed in its design will be 8.75" x 11.25" before being trimmed to a finished size of 8.5" x 11".
In contrast, a piece with no bleed keeps all the printed elements a minimum of .125" (3mm) away from the edge of the paper on all four sides. Nothing is printed to the finished edge of the paper.
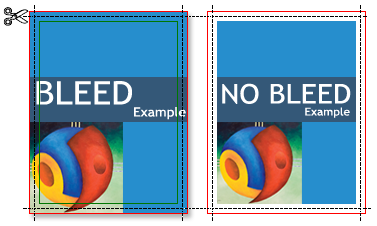 Bleed vs. No Bleed The illustration on the left shows a page printed with bleed, before trimming. When trimmed, the finished piece will have color or graphic content extending to the finished, cut edge on all four sides.The illustration on the right shows a page designed without any bleed. When trimmed, the finished piece will have an unprinted border on all four sides. |
What is the trim edge?
A sheet with bleed is larger than its finished size. The "trim edge" refers to each edge of the sheet after it has been cut to its finished size. Any printed elements that extend beyond the trim edge will be cut off in the process of reducing the paper to its finished size.
What is the safety zone?
To avoid being trimmed off, text and other important matter must stay within a "safety zone" that is is a minimum of .125" (3mm) away from the trim edge. Any design elements that extend beyond the safety zone risk being cut off in the process of trimming the paper to its finished size. For example, the safety zone for an 8.5" x 11" letterhead would be .125" smaller on each side, or 8.25" x 10.75".
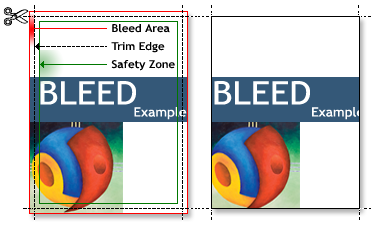 Bleed Before and After Trimming The illustration on the left shows a document designed with bleed (finished size plus an extra .125" (3mm) on each side). Because minor variations can occur when cutting the paper to its finished size, to avoid being trimmed off, text and other important matter must stay .125" (3mm) away from the trim edge (the "safety zone").
The illustration on the right shows the printed piece after trimming. Note the last "e" in "Example" has been cut in half because it extended past the safety zone and into the trimming area. Some of the artwork has been cut off for the same reason. Any elements that extend past the safety zone risk being lost in the process of trimming the paper to its finished size. |
How do I create bleed in my design?
To create bleed in your design, simply make sure the background color, graphic, or image you want it to bleed extends off the the final trim edge of the page by .125" (3mm).
If you are creating your file in an application such as Photoshop, you must make your document height and width dimensions .25" (6mm) larger than your final trim size. For example, if the finished size is 8.5" x 11" then make your document 8.75" x11.25". Position guides that are .125" from each edge. For design purposes, these guides will represent where the paper (and any of your design elements) will be cut.
Position any background color, graphic, or image that you want to bleed so they extended past your guides, all the way to the outside edge of the document. Remember, the extra .125" will be cut off after your piece is printed.
Back to Top
Borders
Does you piece contain a graphic or artistic border close to the paper edge? See related Bleed above and Safety Zone below. When paper is trimmed there is a cutting tolerance of 1/16" which may result in uneven borders. For this reason we do not recommend borders. However, if they are necessary in your piece, the border should be at least 1/4" thick and at least 3/8" from the bleed line. Perfect trimming is not guaranteed.
Back to Top
Color Mode
Does your piece contain more than black color? Files that contain color text, artwork, or images must be saved in four color "CMYK" (Cyan, Magenta, Yellow, Black) color mode. Files submitted in the RGB or Pantone color mode will need to be converted to CMYK. Note that converting RGB to CMYK will cause a color shift as they are not the same color spectrum.
Is your piece black and white? Files that are black and white must have all artwork or images in Grayscale color mode.
Back to Top
Fonts
Are you using vector-based software such CorelDraw, Adobe Illustrator, Adobe InDesign, or Adobe Freehand? For vector files such as these all text must be converted to outlines before creating the file (preferably PDF) you send us.
Are you using a bitmap-based (a.k.a. raster) software application such as Adobe Photoshop? For bitmap files such as these, simply flatten the image. Avoid font sizes smaller than 8 pts or fonts that are very narrow as these may not print, or will lack crispness, or may not display well against dark backgrounds.
Back to Top
Image Resolution
While your computer screen will display low resolution images well, when printed they will look rough, blurry and jagged. For best printing results, a resolution of at least 300 dpi is recommend. Files with resolution lower than 300 dpi can be printed, but the results may be unsatisfactory.
Back to Top
Lines
Do you have lines on your piece? All lines should be at least .25 pts thick to make them printable. Thinner lines may display on your screen but be too thin to print.
Back to Top
Safety Zone
Does your piece have any images, text or other elements close to the page edge? If too close, it may get cut off. Establish a no-go "safety zone" of at least 1/8" from the edge of the final trim size. To avoid any images or text being cut off when the piece is trimmed, do not place them in the safety zone.
Back to Top
Size
Does your artwork contain images, text or graphics that extend the the very edge of the finished piece? This is called "bleeding off the edge" or simply "bleed". Files with bleed need to be built to the final trim size plus 1/8" extra on each side for the bleed. Example, if you are ordering an 8.5" x 11" sell sheet, the graphic file's size should 8.75" x 11.25". When saving the file into the proper format (preferably PDF), do not use any crop or printer's marks. These will increase the dimensions of the file.
We look forward to earning your business every day.